Last year I described a method to implement asynchronous unit testing in Xcode 5.
Let’s remind ourselves of the problem with asynchronous unit testing. Many APIs on the iOS platform themselves are asynchronous. They have use callback invocations to signal when they’re completed, and these may run in different queues. They may make network requests or write to the local file system. These can be time-consuming tasks that need to run in the background. This creates a problem because tests themselves run synchronously. So our tests need to wait until they are notified of when the running task has completed.
I proposed a method that entailed setting a boolean flag in the unit test and looping in a while() loop until the flag was set to false, allowing the test to complete properly. This method worked most of the time but I have never been happy with it, regarding it as a bit of a kludge. In that blog post I concluded:
I still have my reservations about this technique, and I’m still looking for the perfect solution for asynchronous unit testing in Xcode. You would think that Apple might have provided a solution in XCTest, perhaps similar to the implementation in GHUnit.
Here’s what the Objective-C version of a bare bones example asynchronous unit test in Xcode 5 using the old method looks like:
- (void)testSaveAndCreateDocument {
    NSURL *url = ...; // URL to file
    UIManagedDocument *document = [[UIManagedDocument alloc] initWithFileURL:url];

    // Set the flag to YES
    __block BOOL waitingForBlock = YES;

    // Call the asynchronous method with completion block
    [document saveToURL:document.fileURL
        forSaveOperation:UIDocumentSaveForCreating completionHandler:^(BOOL success) {
            // Set the flag to NO to break the loop
            waitingForBlock = NO;
            // Assert the truth
            STAssertTrue(success, @"Should have been success!");
        }];

    // Run the loop
    while(waitingForBlock) {
        [[NSRunLoop currentRunLoop] runMode:NSDefaultRunLoopMode
                                 beforeDate:[NSDate dateWithTimeIntervalSinceNow:0.1]];
    }
}
In fact, because I was re-using the same pattern in many of my tests, I converted parts of it to a Macro that had to be included in each header file. Also, I noted that under some conditions the test didn’t complete properly.
Well, the good news is that, less than a year later, Apple have delivered a means to implement asynchronous unit tests in an intelligent and offcially supported way. Furthermore, not only have they given us a new version of Xcode 6 (still in beta at the time of writing) with this new unit testing framework, but they have also delivered a brand new programming language, Swift. I’ve spent some time over the last few weeks converting a hefty chunk of Objective-C code to Swift, and in converting my Unit Tests to the XCTest framework I implemented Apple’s new methods for asynchronous unit testing. From now on, all of my iOS coding is going to be done in Swift, so the examples below will be in Swift, too.
So, how does it work? In Xcode 6 Apple have added some extensions to the XCTestCase class, and I’m going to focus on two of them:
There’s also a new class, XCTestExpectation which has one method:
class XCTestExpectation : NSObject {
    func fulfill()
}
Basically, you declare an “expectation” in your unit test, and loop in a wait loop waiting for the expectation to be fulfilled in your code. It’s the same pattern as before, but with more options. Here’s the old Objective-C code converted to Swift using the new framework:
    func testSaveAndCreateDocument() {
        let url = NSURL.URLWithString("path-to-file")
        let document = UIManagedDocument(fileURL: url)

        // Declare our expectation
        let readyExpectation = expectationWithDescription("ready")

        // Call the asynchronous method with completion handler
        document.saveToURL(url, forSaveOperation: UIDocumentSaveOperation.ForCreating, completionHandler: { success in
            // Perform our tests...
            XCTAssertTrue(success, "saveToURL failed")

            // And fulfill the expectation...
            readyExpectation.fulfill()
        })

        // Loop until the expectation is fulfilled
        waitForExpectationsWithTimeout(5, { error in
            XCTAssertNil(error, "Error")
        })
    }
In line 6 we instantiate a new instance of XCTestExpectation, named readyExpectation. We give it a simple description for convenience, “ready”. This will be displayed in the test log to help diagnose failures. It is also possible to set more than one expectation as a condition. Then in line 9 we make the call to the code that needs to be tested. In the completion handler, after making our tests, we call the method fulfill() on the expectation. This is equivalent to setting the flag to false in our earlier Objective-C implementation.
The last block of clode starting at line 18 runs the run loop while handling events until all expectations are fulfilled or the timeout is reached. I set the timeout to 5 seconds to be on the safe side.
And that’s about it. There’s more you can do with the new additions to the unit test framework, such as key-value observing, and performance metrics, but the above should be sufficient to get going. Finally, we have a proper framework for Asynchronous Unit Testing in Xcode!
This is a quick guide to parsing a JSON file in iOS, specifically on the iPhone. I’m not going to go into any detail about the history of JSON or why it’s used in preference to, say, XML. If you want to find out more about JSON then check out the following resources:
The use of JSON as a serialisation format has grown in popularity as more and more third parties such as Google, Yahoo, and Twitter provide web services that return JSON formatted data from a given URL appended with a query string. For example, you can get the weather for London from the following URL and appended query (the “q=London,uk” part):
In order to make some sense of this, the iOS developer needs to parse this information and structure it into model data for their application so it can be usefully displayed. It turns out that from iOS 5 onwards, Apple have implemented a relatively simple framework for reading a JSON stream from a given URL (local or on-line) and parsing that stream into information that can be used in an iOS application.
For the following example I’ve put together a JSON file containing some information about six places of interest. Here’s what the file looks like:
{
"locations": [
{
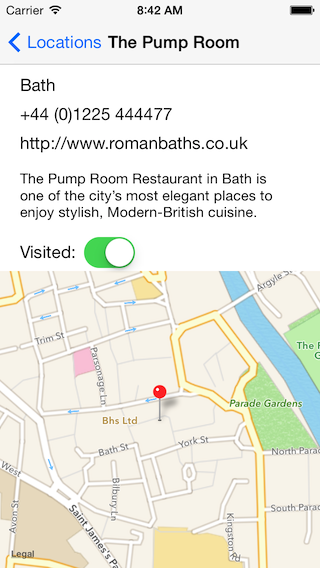
"title": "The Pump Room",
"place": "Bath",
"latitude": 51.38131,
"longitude": -2.35959,
"information": "The Pump Room Restaurant in Bath is one of the city’s most elegant places to enjoy stylish, Modern-British cuisine.",
"telephone": "+44 (0)1225 444477",
"url": "http://www.romanbaths.co.uk",
"visited" : true
},
{
"title": "The Eye",
"place": "London",
"latitude": 51.502866,
"longitude": -0.119483,
"information": "At 135m, the London Eye is the world’s largest cantilevered observation wheel. It was designed by Marks Barfield Architects and launched in 2000.",
"telephone": "+44 (0)8717 813000",
"url": "http://www.londoneye.com",
"visited" : false
},
{
"title": "Chalice Well",
"place": "Glastonbury",
"latitude": 51.143669,
"longitude": -2.706782,
"information": "Chalice Well is one of Britain's most ancient wells, nestling in the Vale of Avalon between the famous Glastonbury Tor and Chalice Hill.",
"telephone": "+44 (0)1458 831154",
"url": "http://www.chalicewell.org.uk",
"visited" : true
},
{
"title": "Tate Modern",
"place": "London",
"latitude": 51.507774,
"longitude": -0.099446,
"information": "Tate Modern is a modern art gallery located in London. It is Britain's national gallery of international modern art and forms part of the Tate group.",
"telephone": "+44 (0)20 7887 8888",
"url": "http://www.tate.org.uk",
"visited" : true
},
{
"title": "Eiffel Tower",
"place": "Paris",
"latitude": 48.858271,
"longitude": 2.294114,
"information": "The Eiffel Tower (French: La Tour Eiffel, is an iron lattice tower located on the Champ de Mars in Paris.",
"telephone": "+33 892 70 12 39",
"url": "http://www.tour-eiffel.fr",
"visited" : false
},
{
"title": "Parc Guell",
"place": "Barcelona",
"latitude": 41.414483,
"longitude": 2.152579,
"information": "Parc Guell is a garden complex with architectural elements situated on the hill of El Carmel in the Gràcia district of Barcelona.",
"telephone": "+34 902 20 03 02",
"url": "http://www.parkguell.es",
"visited" : false
}
]
}
To demonstrate parsing this JSON file, I’ve created a simple iPhone project that reads in the file, parses it and creates a “Location” class for each location entry declared in the JSON. This is then displayed as a list in a table view controller which then links to a detail view controller displaying more information together with a map and a map pin (annotation) showing the location of the selected place.
The example Xcode project is hosted at GitHub and you can either clone it or download it from here:
(Note that I’ve set up this project to run on iOS 7. You’ll also need to be using Xcode 5.)
Load the project into Xcode and run it in the iOS simulator. When you see the first screen you’ll see a simple table displaying six location names and places:
JSON data in table format
Selecting a row in the table view initiates a segue to a new view controller that displays more detail about the location and a pin on a map:
JSON data
Let’s examine how we load and display the raw JSON data in the application, starting at the point where the first table is displayed.
Open up the LocationsViewController.m class file and take a look at the viewDidLoad method:
- (void)viewDidLoad {
    [super viewDidLoad];

    // Create a new JSONLoader with a local file URL
    JSONLoader *jsonLoader = [[JSONLoader alloc] init];
    NSURL *url = [[NSBundle mainBundle] URLForResource:@"locations" withExtension:@"json"];

    // Load the data on a background queue...
    // As we are using a local file it's not really necessary, but if we were connecting to an online URL then we'd need it
    dispatch_async(dispatch_get_global_queue(DISPATCH_QUEUE_PRIORITY_DEFAULT, 0), ^{
        _locations = [jsonLoader locationsFromJSONFile:url];
        // Now that we have the data, reload the table data on the main UI thread
        [self.tableView performSelectorOnMainThread:@selector(reloadData) withObject:nil waitUntilDone:YES];
    });
}
viewDidLoad is the method that’s called when the Table View Controller is first created and displayed, so this is a good place to load the JSON data file. First we create a new instance of the class JSONLoader, which we’ll look at soon, and then a URL which is the location of our JSON file. If the JSON file was located online you would create an online URL here, but for this example we’re using a local file as this ensures we can run the project without any connection issues. Once we’ve done this, we call the locationsFromJSONFile: method on the JSONLoader instance. This will return an NSArray of Location objects that we can then use as a data source to display in the table. Notice that the NSArray instance variable, _locations, has been declared in the first line of the implementation:
NSArray *_locations;
Once the array of Location objects has been returned by the call to locationsFromJSONFile:, we then ask the table view to reload its data. This will in turn trigger the call of the Table View Controller methods, tableView:cellForRowAtIndexPath: and tableView:numberOfRowsInSection: which will supply the information needed to display the rows in the table.
Notice that the method call locationsFromJSONFile: is dispatched on a queue. This ensures that the operation to connect to the URL and fetch the JSON data is performed on a background thread so that we don’t block the UI. Once the data has been received we can then load the data in the table on the main UI thread by calling performSelectorOnMainThread:withObject:waitUntilDone:. The golden rule in iOS is that all UIKit objects methods should be accessed on the main thread.
The over-ridden method prepareForSegue:sender: simply ascertains which row in the table was selected and passes on the corresponding Location object to the target destination View Controller. This destination view, LocationDetailViewController, then displays the information in the Location object in a set of text fields and as a pin on a map.
Now that we know how the JSON data is loaded and presented to the user in a table view, let’s look under the hood at the model classes that do the work of parsing the contents of the JSON file and turning it into something that we can use in the application. Open the class file, JSONLoader.m and look at the following code:
- (NSArray *)locationsFromJSONFile:(NSURL *)url {
    // Create a NSURLRequest with the given URL
    NSURLRequest *request = [NSURLRequest requestWithURL:url
                                             cachePolicy:NSURLRequestReloadIgnoringLocalAndRemoteCacheData
                                         timeoutInterval:30.0];

    // Get the data
    NSURLResponse *response;
	NSData *data = [NSURLConnection sendSynchronousRequest:request returningResponse:&response error:nil];

    // Now create a NSDictionary from the JSON data
    NSDictionary *jsonDictionary = [NSJSONSerialization JSONObjectWithData:data options:0 error:nil];

    // Create a new array to hold the locations
    NSMutableArray *locations = [[NSMutableArray alloc] init];

    // Get an array of dictionaries with the key "locations"
    NSArray *array = [jsonDictionary objectForKey:@"locations"];
    // Iterate through the array of dictionaries
    for(NSDictionary *dict in array) {
        // Create a new Location object for each one and initialise it with information in the dictionary
        Location *location = [[Location alloc] initWithJSONDictionary:dict];
        // Add the Location object to the array
        [locations addObject:location];
    }

    // Return the array of Location objects
    return locations;
}
The NSURLRequest and NSURLConnection part of the code is pretty much the standard approach to getting data from a given URL. We are using the static method sendSynchronousRequest rather than an asynchronous call because the whole method is being called on a queue as we saw earlier. The magic happens in this line:
The NSJSONSerialization class has a static method, JSONObjectWithData:options:error, which parses an NSData object and returns a Foundation object. This is typically an NSDictionary or an NSArray depending on how the JSON data is structured. The example locations.json file is structured as a dictionary consisting of one key, “locations”, mapped to an array of dictionary values. We access the array with the following line:
#import "Location.h"

@implementation Location

// Init the object with information from a dictionary
- (id)initWithJSONDictionary:(NSDictionary *)jsonDictionary {
    if(self = [self init]) {
        // Assign all properties with keyed values from the dictionary
        _title = [jsonDictionary objectForKey:@"title"];
        _place = [jsonDictionary objectForKey:@"place"];
        _information = [jsonDictionary objectForKey:@"information"];
        _telephone = [jsonDictionary objectForKey:@"telephone"];
        _latitude = [jsonDictionary objectForKey:@"latitude"];
        _longitude = [jsonDictionary objectForKey:@"longitude"];
        _url = [jsonDictionary objectForKey:@"url"];
        _visited = [jsonDictionary objectForKey:@"visited"];
    }

    return self;
}

@end
The Location class is simply a set of properties that map to the key names that are found in the location.json file. If you recall, the first set of data looks like this:
"title": "The Pump Room",
"place": "Bath",
"latitude": 51.38131,
"longitude": -2.35959,
"information": "The Pump Room Restaurant in Bath is one of the city’s most elegant places to enjoy stylish, Modern-British cuisine.",
"telephone": "+44 (0)1225 444477",
"url": "http://www.romanbaths.co.uk",
"visited" : true
So, by writing code like this:
_title = [jsonDictionary objectForKey:@"title"];
we are effectively assigning values to the properties in the Location class:
title = “The Pump Room”
place = “Bath”
and so on. (Note that the instance variables are prefixed with underscores. Because the properties are readonly we can only assign values directly to the underlying instance variables which are automatically synthesised for us).
We now have all of the information for a location encapsulated conveniently in a model class, Location.
If we take a look at the LocationDetailViewController.m class file we can see that in the viewDidLoad method we access all of these properties to populate the fields in the view. Note that the boolean value for “visited” is a NSNumber type which has to be converted to a BOOL type in order to set the value for the UISwitch control. The latitude and longitude properties are also NSNumber objects and these have to be converted to double values to create the coordinates for the map pin.
Wrap up
This post has, I hope, given you a start with parsing JSON and mapping the data to a simple model class. Of course, the structure and hierarchy of your own model classes will depend on the structure of the data in whatever JSON file or stream that you are working with.
I think most iOS developers know by now how to create a segue from one View Controller (VC) to another. A segue is the transition between one View Controller and another that occurs when you press a button, or press on a row in a table. It’s easy enough to create one in Interface Builder simply by Ctrl-dragging from the source object to the target View Controller. The options for the segue are “Push”, “Modal” and “Custom”.
Push Segue
A Push segue is used when you’re using a Navigation Controller. The first VC is placed on the navigation stack and the Second View Controller slides into view. When you press the “Back” button the Second VC is dismissed and the first VC is “popped” off the stack and is presented again.
Modal Segue
A “Modal” segue creates a relationship between the VC that did the presenting and the VC that was presented. Put simply, when a modal segue occurs, the target VC is presented in front of the source VC and it’s the responsibility of the presented VC to dismiss itself at some point, perhaps when triggered by pressing a “Done” or “Cancel” button.
Transitions
On an iPhone, there are four types of transitions available:
Cover Vertical (default)
Used to interrupt the current workflow to gather information from the user. The presented VC should provide buttons to dismiss itself by means of a “Done” button and an optional Cancel button.
Flip Horizontal
Used to temporarily change the work mode of the app. For example, to display settings as in the Stocks and Weather apps. Usually requires a button to return the user to the previous state.
Cross Dissolve
Used to present an alternate interface when the device changes orientations. The app is responsible for presenting and dismissing the alternate VC in response to orientation change notifications.
Partial Curl
Used to curl up one corner of the current VC to reveal a partial view on the presented VC. This transition was used in the Maps app on iOS 6 to reveal settings.
The first three of these stock transitions are fine for the prescribed cases where you want to adhere to Apple’s UI guidelines, but I’m not sure if the Partial Curl transition style fits in with the new flat design philosophy of iOS 7. We’re beginning to see different types of transitions in iOS 7 where views seem to “fly in” and “fly out”, and, in fact, Apple have introduced a new API using the UIViewControllerAnimatedTransitioning protocol to manage these animations. This will be the subject of a future blog post.
Custom Segue
In this post I want to show how to create an expanding and contracting animated transition using the third segue type, “Custom”. In this transition, pressing a button in the first View Controller will initiate an animation effect where the target View Controller expands and grows from the button to become a full screen view. Once the target VC is displayed, pressing another button will show an animation of the view shrinking back to the original button. This latter transition will use an “Unwind Segue”, a type of segue that reverses back to the original VC.
The example Xcode project is hosted at GitHub and you can either clone it or download it from here:
(Note that I’ve set up this project to run only on iOS 7. This makes it easier to work with. You’ll therefore need to be using Xcode 5.)
Load the example project in Xcode and run it in the iOS simulator. When you see the first screen press the “Segue Segue Sputnik!” button:
First View Controller
This will animate to the next screen, the Second View Controller:
Second View Controller
Now press the “Get Back!” button. Notice how the screen shrinks back to the original button. Quite a nice effect. Let’s see how it’s done.
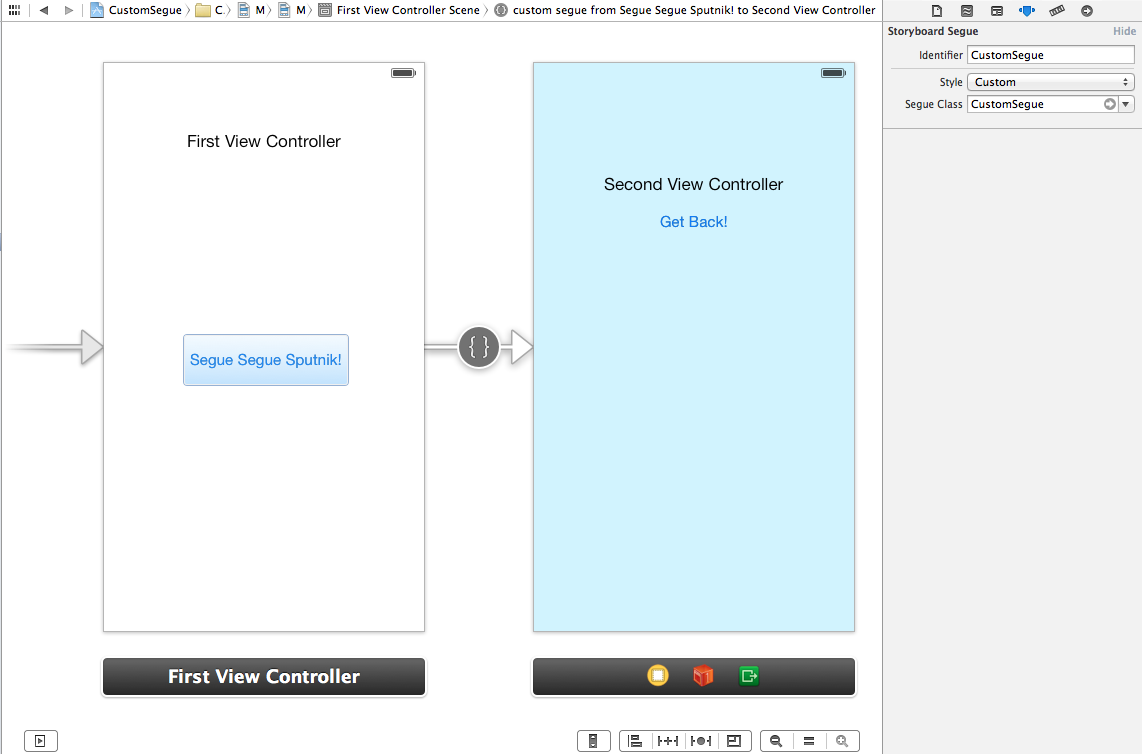
First of all, let’s take a look at how we create the forward segue.
In Xcode select the “Main.storyboard” file so that you can view it in the Storyboard editor. Then select the segue (arrow) that goes from the left View Controller to the right View Controller so that you can view its properties in the Inspector:
Storyboard
To create the segue I simply Ctrl-dragged from the button in the left VC to the right VC. Xcode created the segue for me, and all I had to do was edit the details in the Inspector. If you look in the Inspector, you can see that I’ve given the segue an identifier name of “CustomSegue”, chosen the style “Custom”, and referenced the class, “CustomSegue”. So what does the CustomSegue class actually do? Let’s take a look at it:
@implementation CustomSegue

- (void)perform {
    UIViewController *sourceViewController = self.sourceViewController;
    UIViewController *destinationViewController = self.destinationViewController;

    // Add the destination view as a subview, temporarily
    [sourceViewController.view addSubview:destinationViewController.view];

    // Transformation start scale
    destinationViewController.view.transform = CGAffineTransformMakeScale(0.05, 0.05);

    // Store original centre point of the destination view
    CGPoint originalCenter = destinationViewController.view.center;
    // Set center to start point of the button
    destinationViewController.view.center = self.originatingPoint;

    [UIView animateWithDuration:0.5
                          delay:0.0
                        options:UIViewAnimationOptionCurveEaseInOut
                     animations:^{
                         // Grow!
                         destinationViewController.view.transform = CGAffineTransformMakeScale(1.0, 1.0);
                         destinationViewController.view.center = originalCenter;
                     }
                     completion:^(BOOL finished){
                         [destinationViewController.view removeFromSuperview]; // remove from temp super view
                         [sourceViewController presentViewController:destinationViewController animated:NO completion:NULL]; // present VC
                     }];
}

@end
Our Custom segue is an instance of UIStoryBoardSegue. This makes sense as we’re using a segue as created in a Storyboard. There’s only one method that we need to over-ride, the perform method, and this will be called when the segue occurs. As the UIStoryBoardSegue instance contains two properties for the source and target View Controllers we can grab references to those in order to create the animated transition between the two. The rest of the code adds the destination’s view to the source view as a sub-view temporarily so we can see it and create the animation effect. This consists of shrinking the view to a small size, setting its centre point to the originating point (as we’ll see later this is set to be the button that we press) and animating it back to its original size and centre point with a call to [UIView animateWithDuration]. When the animation completes in the completion block, we remove the destination view from its parent super view and then present the destination VC.
Note that our CustomSegue class has a property, originatingPoint, declared in the header file:
@interface CustomSegue : UIStoryboardSegue

// Originating point for animation
@property CGPoint originatingPoint;

@end
The custom segue needs to know the originating point from which to start the animation. This is the “Segue Segue Sputnik” button in the first VC. This is set in FirstViewController.m:
// Prepare for the segue going forward
- (void)prepareForSegue:(UIStoryboardSegue *)segue sender:(id)sender {
    if([segue isKindOfClass:[CustomSegue class]]) {
        // Set the start point for the animation to center of the button for the animation
        ((CustomSegue *)segue).originatingPoint = self.segueButton.center;
    }
}
The method, prepareForSegue:, is invoked just before the segue occurs. This gives us an opportunity to set things up, in our case by checking that this is the right kind of segue (we could have more than one) and to set the CustomSegue‘s originatingPoint to the centre of the button. Once this is done, the segue occurs.
Unwind Custom Segue
Now that we’ve examined how to create a segue going forward, let’s look at how we get back from the second View Controller to the first View Controller. This is done by creating an “unwind segue”. But before we can create one in the Storyboard, there’s one thing we need to do first. An unwind segue requires that you provide an IBAction method in the View Controller that you want to unwind to. This method can have any name but it needs to have the following method signature:
We’ve implemented this in FirstViewController. We don’t actually do anything when this is invoked, but we still need to provide it in order to form the link in the Storyboard, as we shall see.
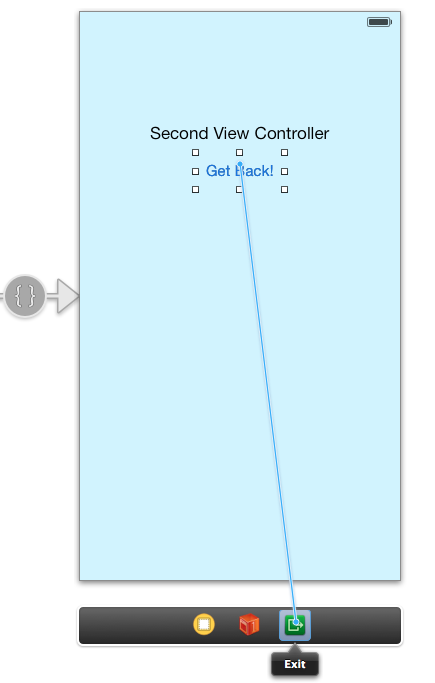
Once we’ve done that, it’s easy enough to create the unwind segue in the Storyboard by Ctrl-dragging from the “Get Back!” button in the second VC to the green “Exit” button:
Making the Unwind Segue
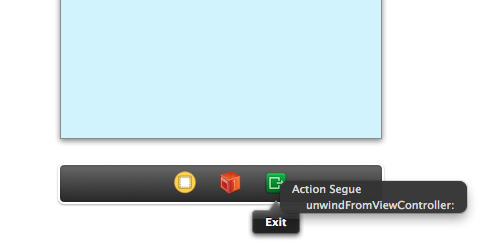
When you release the mouse-button, you’ll see the method name and you can link the connection to it:
Linking to the method
Now you’ve created the “glue” between the second View Controller and the first View Controller, you need to provide an instance of the UIStoryboardSegue that will be used to perform the unwind. When we created the forward segue earlier by Ctrl-dragging from the “Segue Segue Sputnik!” button to the second VC we could specify the identifier and class of the custom segue in the Inspector. With unwind segues we can’t do this, instead we have to instantiate one in code. We can do this in the FirstViewController class by over-riding the segueForUnwindingToViewController: method that’s declared in UIViewController. Here’s our implementation:
// We need to over-ride this method from UIViewController to provide a custom segue for unwinding
- (UIStoryboardSegue *)segueForUnwindingToViewController:(UIViewController *)toViewController fromViewController:(UIViewController *)fromViewController identifier:(NSString *)identifier {
    // Instantiate a new CustomUnwindSegue
    CustomUnwindSegue *segue = [[CustomUnwindSegue alloc] initWithIdentifier:identifier source:fromViewController destination:toViewController];
    // Set the target point for the animation to the center of the button in this VC
    segue.targetPoint = self.segueButton.center;
    return segue;
}
Here we instantiate a new instance of CustomUnwindSegue with the parameters that are passed from the segueForUnwindingToViewController: method and then set the target point that the animation will shrink the view to, in fact it’s the inverse of what we did earlier. If we look at the code for the CustomUnwindSegue class, we can see that it pretty much reverses what we did in the CustomSegue class:
When the animation completes in the completion block we remove the animated view from its parent (as we did earlier) and then dismiss the VC, thus revealing the FirstViewController.
Wrap up
And that’s about it. Please note that you’ll need to target a minimum of iOS 6 in order to work with unwind segues. I think that this is a useful basic pattern for implementing custom segues and unwind segues. Once you’ve established this in your application you can then go on to experiment with different animation techniques as you transition from one VC to the next. As I wrote earlier, iOS 7 introduces some new API to handle animated transitions, and I’ll look at this in a future post.
Unit Test support is greatly improved in Xcode 5, with new features such as the Test Navigator and individual test runs. XCTest is the new framework, replacing OCUnit. I’d hoped there would be better support for testing asynchronous calls with all of this new stuff, but sadly this is not the case. So, what’s the issue here?
Some methods in the iOS API work asynchronously, on a background queue, and are completed on a completion block, at some point after invoking them. Here’s an example:
- (void)testSaveAndCreateDocument {
    NSURL *url = ...; // URL to file
    UIManagedDocument *document = [[UIManagedDocument alloc] initWithFileURL:url];

    // Call the asynchronous method with completion block
    [document saveToURL:document.fileURL
        forSaveOperation:UIDocumentSaveForCreating completionHandler:^(BOOL success) {
            STAssertTrue(success, @"Should have been success!");
        }];
}
In this Unit Test, we’re testing the creation and saving of a blank UIManagedDocument. The completion handler block is invoked when the operation completes and we test for a True value of the “success” block parameter. If we run the test from Xcode it will pass. It will always pass, and never fail. That’s because the test exits before the completion handler is invoked. We can check this is so by setting a breakpoint on the following line:
STAssertTrue(success, @"Should have been success!");
Run the test. The breakpoint is never reached and so we can never test the value.
So how can we ensure that the test method waits until the asynchronous method invokes the completion block? There have been a few solutions proposed on places like Stack Exchange, and after playing with a few, I use the following one.
In this solution, we need to declare a Boolean flag that indicates that we’re waiting for the operation to complete, then call the asynchronous method, and then block the run loop until the test completes when the flag is set to NO.
Here’s how we do it. We need to declare our Boolean flag before calling the asynchronous method:
__block BOOL waitingForBlock = YES;
Then we must set it to NO inside the method’s completion block:
- (void)testSaveAndCreateDocument {
NSURL *url = ...; // URL to file
UIManagedDocument *document = [[UIManagedDocument alloc] initWithFileURL:url];
// Set the flag to YES
__block BOOL waitingForBlock = YES;
// Call the asynchronous method with completion block
[document saveToURL:document.fileURL
forSaveOperation:UIDocumentSaveForCreating completionHandler:^(BOOL success) {
// Set the flag to NO to break the loop
waitingForBlock = NO;
// Assert the truth
STAssertTrue(success, @"Should have been success!");
}];
// Run the loop
while(waitingForBlock) {
    [[NSRunLoop currentRunLoop] runMode:NSDefaultRunLoopMode
                             beforeDate:[NSDate dateWithTimeIntervalSinceNow:0.1]];
}
}
Run the test again, and this time the breakpoint is reached.
This seems somewhat cumbersome, especially if we need to do this in many Unit Tests. So we can convert this into a set of Macros and declare them in a supporting header file:
// Set the flag for a block completion handler
#define StartBlock() __block BOOL waitingForBlock = YES

// Set the flag to stop the loop
#define EndBlock() waitingForBlock = NO

// Wait and loop until flag is set
#define WaitUntilBlockCompletes() WaitWhile(waitingForBlock)

// Macro - Wait for condition to be NO/false in blocks and asynchronous calls
#define WaitWhile(condition)
do {
    while(condition) {
        [[NSRunLoop currentRunLoop] runMode:NSDefaultRunLoopMode beforeDate:[NSDate dateWithTimeIntervalSinceNow:0.1]];
    }
} while(0)
Now we can simplify our test:
- (void)testSaveAndCreateDocument {
    NSURL *url = ...; // URL to file
    UIManagedDocument *document = [[UIManagedDocument alloc] initWithFileURL:url];

    // Set the flag
    StartBlock();

    // Call the asynchronous method with completion block
    [document saveToURL:document.fileURL
        forSaveOperation:UIDocumentSaveForCreating completionHandler:^(BOOL success) {
            // Set the flag to NO to break the loop
            EndBlock();
            // Assert the truth
            STAssertTrue(success, @"Should have been success!");
        }];

    // Run the Wait loop
    WaitUntilBlockCompletes();
}
Using the Macros makes things much clearer. We’re simply initialising a flag to YES with the StartBlock() pseudo-function, setting it to NO with EndBlock() and waiting for the flag to be set to NO in the WaitUntilBlockCompletes() call.
It’s not the most elegant solution, but it suffices for my needs.
A caveat – sometimes this solution does not work using Xcode 5 with iOS 7, especially when dealing with a UIManagedDocument. In some cases there seems to be a race condition or threading issue going on. (See the workaround in the comments for UIManagedDocument.) Also, with the iOS 7 simulator, I’m seeing more and more cases where this wait loop is not working, and some unit tests are not being run. It’s as if some tests are not waiting for the loop to break and failing to run. I’ve tried increasing the value of dateWithTimeIntervalSinceNow in this line of the macro:
But it seems as if the main UI thread seems to get stuck in some tests, and can only be unstuck by clicking on the simulator, or waiting a few seconds. Something has changed in Xcode 5 and/or iOS 7, but I don’t know what it is. If you have problems with this, experiment with the date value in this line. It may just be an issue with the simulator. Try testing on the device as well.
I still have my reservations about this technique, and I’m still looking for the perfect solution for asynchronous unit testing in Xcode. You would think that Apple might have provided a solution in XCTest, perhaps similar to the implementation in GHUnit.
Update 14 July 2014 – Good news! Apple has introduced a great new framework to support asynchronous unit testing in Xcode 6 (still in beta at the moment). I’ve written a new post on how to implement this here.
Singletons are supposed to be bad practice in any programming language. One of the arguments against their use is that they are difficult to re-use, they hide dependencies, they’re hard to sub-class, and loads of other reasons that I can’t remember since I fell sleep reading them…
Bullshit. There are clear cases where a Singleton makes sense, for instance when you are only ever going to use one instance of a class – for example an application’s data model. The key is to make your singleton re-usable and interchangeable and to provide a façade to the implementation by means of an interface – “write to the interface”. This ensures that the class is not really a Singleton, but that you are accessing a single default instance of the class. This is a subtle difference.
Here’s the canonical way of declaring a Singleton in Objective-C:
The dispatch_once call ensures that the instantiation is thread-safe. That’s it. It’s limited but it works. However, this pattern is the one that the critics shoot down. Here’s a better pattern…
We’re going to create a re-usable Data Model Manager class (DataModelManager) where we can access just one instance (the Singleton), via a Factory class, of an implementation of an Objective-C Protocol and still have the freedom to swap out the implementation if needed (and sub-class, too).
Here’s the Protocol for the Data Model Manager and the Interface that will serve as the factory class:
// The Protocol declaring the instance methods that we need for our DataModelManager class
@protocol DataModelManager

-(void)setup;
// Other method declarations...

@end

// Factory class that returns a shared DataModelManager type class
@interface DataModelManagerFactory : NSObject

+ (id)sharedInstance;

@end
Any required instance methods for the Data Model Manager should be declared in the Protocol. This is equivalent to a Java Interface. We are declaring those methods that any implementation of the DataModelManager protocol has to implement (required). The DataModelManagerFactory interface returns the (Singleton) shared instance of DataModelManager. The implementation is opaque to the user, and is in fact interchangeable. What we have declared so far is the public API. The consumer doesn’t need to know any more than that.
Here’s the implementation:
@implementation DataModelManagerFactory

// Factory class method
+ (id)sharedInstance {
    // Retrieve class name from a config file or inject it...
    static NSString *className = @"TheDataModelManager";
    static dispatch_once_t once;
    static id instance;
    dispatch_once(&once, ^{
        instance = [[NSClassFromString(className) alloc] init];
    });
    return instance;
}

@end
We’re using the same traditional Singleton pattern as before, except that we’re declaring the class name of the actual implementation of the DataModelManager protocol in an NSString. This could be declared and retrieved from an external configuration file, or passed as a parameter to the DataModelManagerFactory when initialising. Or hard-coded if you ever need to refactor and provide a different implementation of DataModelManager.
Here’s the interface declaration and implementation of TheDataModelManager:
// Implementation of DataModelManager Protocol
@interface TheDataModelManager : NSObject
@end

@implementation TheDataModelManager

- (void)setup {
    NSLog(@"Setting up TheDataModelManager");
}

@end
If we want to swap out a different implementation class, all we need to do is change the name of the class string in the Factory and provide a matching implementation class of the same name. So if we changed it to this:
// Another implementation of DataModelManager Protocol
@interface AnotherDataModelManager : NSObject
@end

@implementation AnotherDataModelManager

- (void)setup {
    NSLog(@"Setting up AnotherDataModelManager");
}

@end
This pattern ensures that you’re not locked in to a single, static implementation of your Singleton. As the consumer, you only care about the methods that the Singleton declares in its Protocol. The actual implementation can be changed both at compile time and dynamically at run-time if the name of the class is provided to the Factory class. And, as a bonus, it’s easy to substitute a mock class for unit testing.
Let’s modify the Factory class so we can change the class name:
Now we can initialise the DataModelManagerFactory with the class name of our mock DataModelManager class, “MockDataModelManager”:
    [DataModelManagerFactory setClassName:@"MockDataModelManager"];
    id dataModelManager = [DataModelManagerFactory sharedInstance];
    [dataModelManager setup];
All we need do now is implement the MockDataModelManager class.
There’s refinements that could be made to this pattern, and improvements. For example, you could pass a Class type instead of a Class string. It’s the basis for a useful pattern.
You could argue that it’s not really a Singleton pattern at all, but that you are declaring a single access point (the sharedInstance factory class method) to an instance.
In their blog post, the company explain that developing in HTML and JavaScript was not the wisest decision:
…building a complicated mobile application in HTML5 has been hard. Even with frameworks as amazing as Sencha Touch, we’ve found the ability to iterate as fast as we would like has become harder as our application has become more complex.
The HTML / JavaScript stack initially seem attractive as a time-saving route to development, but sadly this isn’t always the case. In an attempt to save time for the developer, the user ends up with a third-rate experience. Xero say:
Xero prides itself on not compromising on customer experience, and when it comes down to it, the question isn’t “How can we use our existing skills to build a mobile application?” but “What is going to enable us to deliver the best customer experience on the mobile devices that our customers use?”
There has been a cost:
And the lesson we’ve learnt over the last 12 months has been that the cost in time, effort and testing to bring an HTML5 application to a native level of performance seems to be far greater than if the application was built with native technologies from the get-go.
…people gravitate towards the products with the best overall user experience. It’s very hard for something developed in a cross-platform, lowest-common-denominator technology to provide as nice an experience as a similar native app.
Sure, I agree, it would be nice to write once, run anywhere, but, as with Java desktop apps, you never get the best experience. Libin is realistic:
As the CEO of a software company, I wish this weren’t true. I’d love to build one version of our App that could work everywhere. Instead, we develop separate native versions for Windows, Mac, Desktop Web, iOS, Android, BlackBerry, HP WebOS and (coming soon) Windows Phone 7. We do it because the results are better and, frankly, that’s all-important. We could probably save 70% of our development budget by switching to a single, cross-platform client, but we would probably lose 80% of our users. And we’d be shut out of most app stores and go back to worrying about distribution.
When all you have is a team of HTML and JavaScript developers, everything looks…third-rate.
Begin typing your search term above and press enter to search. Press ESC to cancel.