
Segues
I think most iOS developers know by now how to create a segue from one View Controller (VC) to another. A segue is the transition between one View Controller and another that occurs when you press a button, or press on a row in a table. It’s easy enough to create one in Interface Builder simply by Ctrl-dragging from the source object to the target View Controller. The options for the segue are “Push”, “Modal” and “Custom”.
Push Segue
A Push segue is used when you’re using a Navigation Controller. The first VC is placed on the navigation stack and the Second View Controller slides into view. When you press the “Back” button the Second VC is dismissed and the first VC is “popped” off the stack and is presented again.
Modal Segue
A “Modal” segue creates a relationship between the VC that did the presenting and the VC that was presented. Put simply, when a modal segue occurs, the target VC is presented in front of the source VC and it’s the responsibility of the presented VC to dismiss itself at some point, perhaps when triggered by pressing a “Done” or “Cancel” button.
Transitions
On an iPhone, there are four types of transitions available:
Cover Vertical (default)
Used to interrupt the current workflow to gather information from the user. The presented VC should provide buttons to dismiss itself by means of a “Done” button and an optional Cancel button.
Flip Horizontal
Used to temporarily change the work mode of the app. For example, to display settings as in the Stocks and Weather apps. Usually requires a button to return the user to the previous state.
Cross Dissolve
Used to present an alternate interface when the device changes orientations. The app is responsible for presenting and dismissing the alternate VC in response to orientation change notifications.
Partial Curl
Used to curl up one corner of the current VC to reveal a partial view on the presented VC. This transition was used in the Maps app on iOS 6 to reveal settings.
The first three of these stock transitions are fine for the prescribed cases where you want to adhere to Apple’s UI guidelines, but I’m not sure if the Partial Curl transition style fits in with the new flat design philosophy of iOS 7. We’re beginning to see different types of transitions in iOS 7 where views seem to “fly in” and “fly out”, and, in fact, Apple have introduced a new API using the UIViewControllerAnimatedTransitioning protocol to manage these animations. This will be the subject of a future blog post.
Custom Segue
In this post I want to show how to create an expanding and contracting animated transition using the third segue type, “Custom”. In this transition, pressing a button in the first View Controller will initiate an animation effect where the target View Controller expands and grows from the button to become a full screen view. Once the target VC is displayed, pressing another button will show an animation of the view shrinking back to the original button. This latter transition will use an “Unwind Segue”, a type of segue that reverses back to the original VC.
The example Xcode project is hosted at GitHub and you can either clone it or download it from here:
https://github.com/Phillipus/CustomSegue
(Note that I’ve set up this project to run only on iOS 7. This makes it easier to work with. You’ll therefore need to be using Xcode 5.)
Load the example project in Xcode and run it in the iOS simulator. When you see the first screen press the “Segue Segue Sputnik!” button:

This will animate to the next screen, the Second View Controller:

Now press the “Get Back!” button. Notice how the screen shrinks back to the original button. Quite a nice effect. Let’s see how it’s done.
First of all, let’s take a look at how we create the forward segue.
In Xcode select the “Main.storyboard” file so that you can view it in the Storyboard editor. Then select the segue (arrow) that goes from the left View Controller to the right View Controller so that you can view its properties in the Inspector:
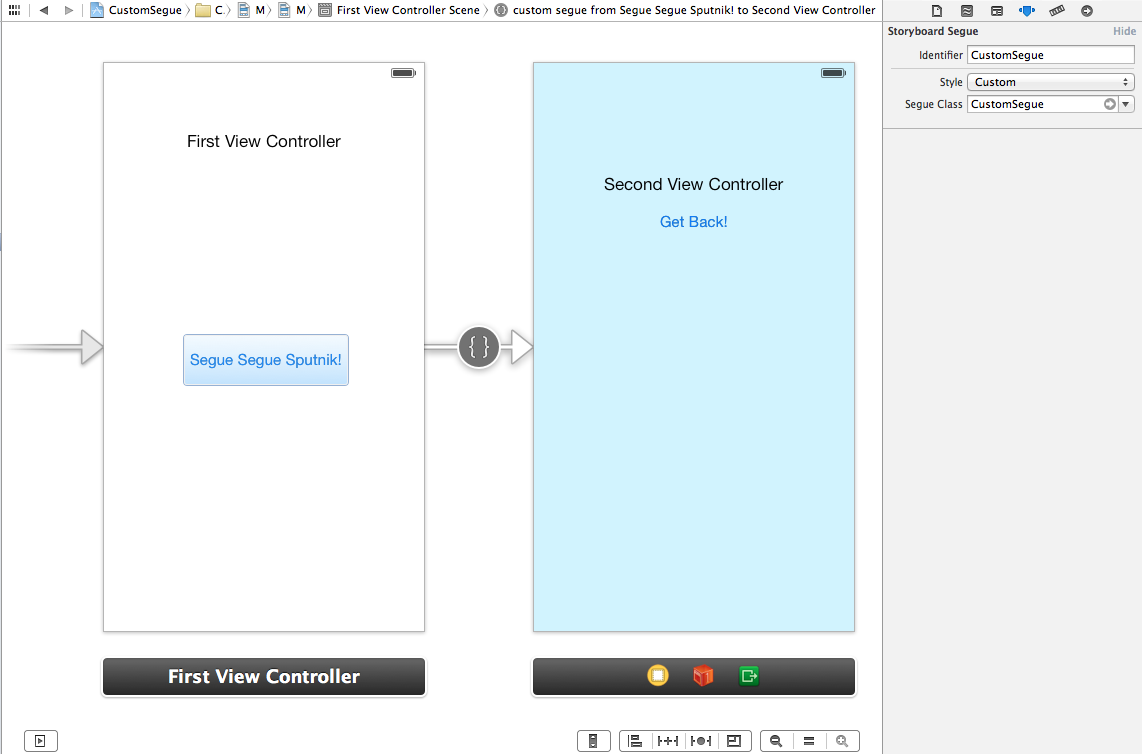
To create the segue I simply Ctrl-dragged from the button in the left VC to the right VC. Xcode created the segue for me, and all I had to do was edit the details in the Inspector. If you look in the Inspector, you can see that I’ve given the segue an identifier name of “CustomSegue”, chosen the style “Custom”, and referenced the class, “CustomSegue”. So what does the CustomSegue class actually do? Let’s take a look at it:
@implementation CustomSegue

- (void)perform {
    UIViewController *sourceViewController = self.sourceViewController;
    UIViewController *destinationViewController = self.destinationViewController;

    // Add the destination view as a subview, temporarily
    [sourceViewController.view addSubview:destinationViewController.view];

    // Transformation start scale
    destinationViewController.view.transform = CGAffineTransformMakeScale(0.05, 0.05);

    // Store original centre point of the destination view
    CGPoint originalCenter = destinationViewController.view.center;
    // Set center to start point of the button
    destinationViewController.view.center = self.originatingPoint;

    [UIView animateWithDuration:0.5
                          delay:0.0
                        options:UIViewAnimationOptionCurveEaseInOut
                     animations:^{
                         // Grow!
                         destinationViewController.view.transform = CGAffineTransformMakeScale(1.0, 1.0);
                         destinationViewController.view.center = originalCenter;
                     }
                     completion:^(BOOL finished){
                         [destinationViewController.view removeFromSuperview]; // remove from temp super view
                         [sourceViewController presentViewController:destinationViewController animated:NO completion:NULL]; // present VC
                     }];
}

@end
Our Custom segue is an instance of UIStoryBoardSegue. This makes sense as we’re using a segue as created in a Storyboard. There’s only one method that we need to over-ride, the perform method, and this will be called when the segue occurs. As the UIStoryBoardSegue instance contains two properties for the source and target View Controllers we can grab references to those in order to create the animated transition between the two. The rest of the code adds the destination’s view to the source view as a sub-view temporarily so we can see it and create the animation effect. This consists of shrinking the view to a small size, setting its centre point to the originating point (as we’ll see later this is set to be the button that we press) and animating it back to its original size and centre point with a call to [UIView animateWithDuration]. When the animation completes in the completion block, we remove the destination view from its parent super view and then present the destination VC.
Note that our CustomSegue class has a property, originatingPoint, declared in the header file:
@interface CustomSegue : UIStoryboardSegue

// Originating point for animation
@property CGPoint originatingPoint;

@end
The custom segue needs to know the originating point from which to start the animation. This is the “Segue Segue Sputnik” button in the first VC. This is set in FirstViewController.m:
// Prepare for the segue going forward
- (void)prepareForSegue:(UIStoryboardSegue *)segue sender:(id)sender {
    if([segue isKindOfClass:[CustomSegue class]]) {
        // Set the start point for the animation to center of the button for the animation
        ((CustomSegue *)segue).originatingPoint = self.segueButton.center;
    }
}
The method, prepareForSegue:, is invoked just before the segue occurs. This gives us an opportunity to set things up, in our case by checking that this is the right kind of segue (we could have more than one) and to set the CustomSegue‘s originatingPoint to the centre of the button. Once this is done, the segue occurs.
Unwind Custom Segue
Now that we’ve examined how to create a segue going forward, let’s look at how we get back from the second View Controller to the first View Controller. This is done by creating an “unwind segue”. But before we can create one in the Storyboard, there’s one thing we need to do first. An unwind segue requires that you provide an IBAction method in the View Controller that you want to unwind to. This method can have any name but it needs to have the following method signature:
- (IBAction)unwindFromViewController:(UIStoryboardSegue *)sender {
}
We’ve implemented this in FirstViewController. We don’t actually do anything when this is invoked, but we still need to provide it in order to form the link in the Storyboard, as we shall see.
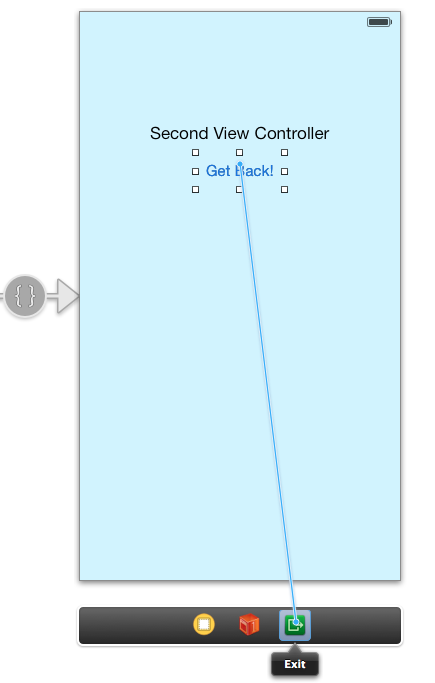
Once we’ve done that, it’s easy enough to create the unwind segue in the Storyboard by Ctrl-dragging from the “Get Back!” button in the second VC to the green “Exit” button:
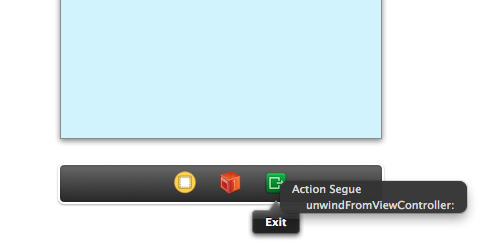
When you release the mouse-button, you’ll see the method name and you can link the connection to it:
Now you’ve created the “glue” between the second View Controller and the first View Controller, you need to provide an instance of the UIStoryboardSegue that will be used to perform the unwind. When we created the forward segue earlier by Ctrl-dragging from the “Segue Segue Sputnik!” button to the second VC we could specify the identifier and class of the custom segue in the Inspector. With unwind segues we can’t do this, instead we have to instantiate one in code. We can do this in the FirstViewController class by over-riding the segueForUnwindingToViewController: method that’s declared in UIViewController. Here’s our implementation:
// We need to over-ride this method from UIViewController to provide a custom segue for unwinding
- (UIStoryboardSegue *)segueForUnwindingToViewController:(UIViewController *)toViewController fromViewController:(UIViewController *)fromViewController identifier:(NSString *)identifier {
    // Instantiate a new CustomUnwindSegue
    CustomUnwindSegue *segue = [[CustomUnwindSegue alloc] initWithIdentifier:identifier source:fromViewController destination:toViewController];
    // Set the target point for the animation to the center of the button in this VC
    segue.targetPoint = self.segueButton.center;
    return segue;
}
Here we instantiate a new instance of CustomUnwindSegue with the parameters that are passed from the segueForUnwindingToViewController: method and then set the target point that the animation will shrink the view to, in fact it’s the inverse of what we did earlier. If we look at the code for the CustomUnwindSegue class, we can see that it pretty much reverses what we did in the CustomSegue class:
@implementation CustomUnwindSegue

- (void)perform {
    UIViewController *sourceViewController = self.sourceViewController;
    UIViewController *destinationViewController = self.destinationViewController;

    // Add view to super view temporarily
    [sourceViewController.view.superview insertSubview:destinationViewController.view atIndex:0];

    [UIView animateWithDuration:0.5
                          delay:0.0
                        options:UIViewAnimationOptionCurveEaseInOut
                     animations:^{
                         // Shrink!
                         sourceViewController.view.transform = CGAffineTransformMakeScale(0.05, 0.05);
                         sourceViewController.view.center = self.targetPoint;
                     }
                     completion:^(BOOL finished){
                         [destinationViewController.view removeFromSuperview]; // remove from temp super view
                         [sourceViewController dismissViewControllerAnimated:NO completion:NULL]; // dismiss VC
                     }];
}

@end
When the animation completes in the completion block we remove the animated view from its parent (as we did earlier) and then dismiss the VC, thus revealing the FirstViewController.
Wrap up
And that’s about it. Please note that you’ll need to target a minimum of iOS 6 in order to work with unwind segues. I think that this is a useful basic pattern for implementing custom segues and unwind segues. Once you’ve established this in your application you can then go on to experiment with different animation techniques as you transition from one VC to the next. As I wrote earlier, iOS 7 introduces some new API to handle animated transitions, and I’ll look at this in a future post.