I finally traced and fixed a nagging bug in Archi that can lead to orphaned diagram elements or, put another way, a corrupt model file. This was an issue that had occurred for a small number of users for some time, but one I’d never been able to reproduce. Until three days ago.
Analysing an Archi user’s specimen file I discovered that some folders were being stored in XML as <element> tags and not as <folder> tags. This meant that some diagram view objects could not be matched to their corresponding model elements in the model tree. This in turn meant that it was possible to delete the referenced model element thus leading to an orphaned diagram node. It turned out to be a dumb logic bug in the model tree’s drag-drop handler. An edge case, but with serious enough consequences. You can view the bug for yourself in all of its glorious stupidity at Github.
Put simply – if you dragged and dropped a folder onto the same parent folder your file could get screwed.
Fixing this bug has been a cause for major celebration. So much so that, after releasing the new version of Archi, I broke open a bottle of Prosecco and immediately emailed those Archi users who had reported the problem with the good news. Tetelestai!
Now that this bug has finally been squashed and a new build published I hope that all Archi users will download the latest version from the new Archi website.
This is a quick guide to parsing a JSON file in iOS, specifically on the iPhone. I’m not going to go into any detail about the history of JSON or why it’s used in preference to, say, XML. If you want to find out more about JSON then check out the following resources:
The use of JSON as a serialisation format has grown in popularity as more and more third parties such as Google, Yahoo, and Twitter provide web services that return JSON formatted data from a given URL appended with a query string. For example, you can get the weather for London from the following URL and appended query (the “q=London,uk” part):
In order to make some sense of this, the iOS developer needs to parse this information and structure it into model data for their application so it can be usefully displayed. It turns out that from iOS 5 onwards, Apple have implemented a relatively simple framework for reading a JSON stream from a given URL (local or on-line) and parsing that stream into information that can be used in an iOS application.
For the following example I’ve put together a JSON file containing some information about six places of interest. Here’s what the file looks like:
{
  "locations": [
    {
      "title": "The Pump Room",
      "place": "Bath",
      "latitude": 51.38131,
      "longitude": -2.35959,
      "information": "The Pump Room Restaurant in Bath is one of the city’s most elegant places to enjoy stylish, Modern-British cuisine.",
      "telephone": "+44 (0)1225 444477",
      "url": "http://www.romanbaths.co.uk",
      "visited" : true
    },
    {
      "title": "The Eye",
      "place": "London",
      "latitude": 51.502866,
      "longitude": -0.119483,
      "information": "At 135m, the London Eye is the world’s largest cantilevered observation wheel. It was designed by Marks Barfield Architects and launched in 2000.",
      "telephone": "+44 (0)8717 813000",
      "url": "http://www.londoneye.com",
      "visited" : false
    },
    {
      "title": "Chalice Well",
      "place": "Glastonbury",
      "latitude": 51.143669,
      "longitude": -2.706782,
      "information": "Chalice Well is one of Britain's most ancient wells, nestling in the Vale of Avalon between the famous Glastonbury Tor and Chalice Hill.",
      "telephone": "+44 (0)1458 831154",
      "url": "http://www.chalicewell.org.uk",
      "visited" : true
    },
    {
      "title": "Tate Modern",
      "place": "London",
      "latitude": 51.507774,
      "longitude": -0.099446,
      "information": "Tate Modern is a modern art gallery located in London. It is Britain's national gallery of international modern art and forms part of the Tate group.",
      "telephone": "+44 (0)20 7887 8888",
      "url": "http://www.tate.org.uk",
      "visited" : true
    },
    {
      "title": "Eiffel Tower",
      "place": "Paris",
      "latitude": 48.858271,
      "longitude": 2.294114,
      "information": "The Eiffel Tower (French: La Tour Eiffel, is an iron lattice tower located on the Champ de Mars in Paris.",
      "telephone": "+33 892 70 12 39",
      "url": "http://www.tour-eiffel.fr",
      "visited" : false
    },
    {
      "title": "Parc Guell",
      "place": "Barcelona",
      "latitude": 41.414483,
      "longitude": 2.152579,
      "information": "Parc Guell is a garden complex with architectural elements situated on the hill of El Carmel in the Gràcia district of Barcelona.",
      "telephone": "+34 902 20 03 02",
      "url": "http://www.parkguell.es",
      "visited" : false
    }
  ]
}
To demonstrate parsing this JSON file, I’ve created a simple iPhone project that reads in the file, parses it and creates a “Location” class for each location entry declared in the JSON. This is then displayed as a list in a table view controller which then links to a detail view controller displaying more information together with a map and a map pin (annotation) showing the location of the selected place.
The example Xcode project is hosted at GitHub and you can either clone it or download it from here:
(Note that I’ve set up this project to run on iOS 7. You’ll also need to be using Xcode 5.)
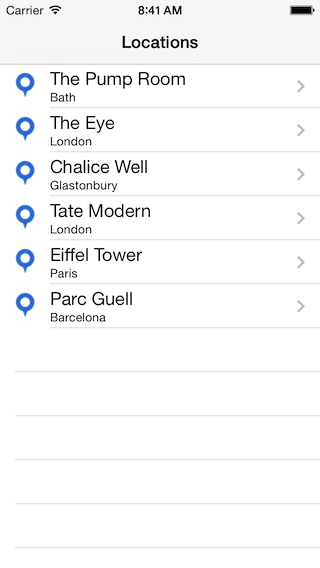
Load the project into Xcode and run it in the iOS simulator. When you see the first screen you’ll see a simple table displaying six location names and places:
JSON data in table format
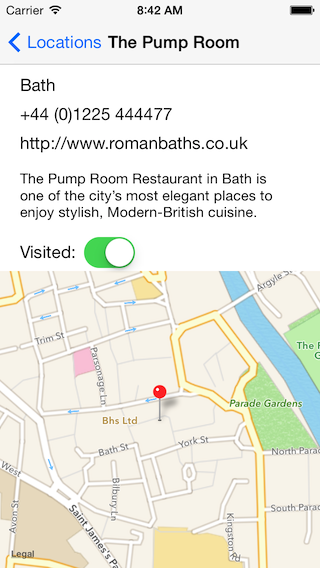
Selecting a row in the table view initiates a segue to a new view controller that displays more detail about the location and a pin on a map:
JSON data
Let’s examine how we load and display the raw JSON data in the application, starting at the point where the first table is displayed.
Open up the LocationsViewController.m class file and take a look at the viewDidLoad method:
- (void)viewDidLoad {
    [super viewDidLoad];

    // Create a new JSONLoader with a local file URL
    JSONLoader *jsonLoader = [[JSONLoader alloc] init];
    NSURL *url = [[NSBundle mainBundle] URLForResource:@"locations" withExtension:@"json"];

    // Load the data on a background queue...
    // As we are using a local file it's not really necessary, but if we were connecting to an online URL then we'd need it
    dispatch_async(dispatch_get_global_queue(DISPATCH_QUEUE_PRIORITY_DEFAULT, 0), ^{
        _locations = [jsonLoader locationsFromJSONFile:url];
        // Now that we have the data, reload the table data on the main UI thread
        [self.tableView performSelectorOnMainThread:@selector(reloadData) withObject:nil waitUntilDone:YES];
    });
}
viewDidLoad is the method that’s called when the Table View Controller is first created and displayed, so this is a good place to load the JSON data file. First we create a new instance of the class JSONLoader, which we’ll look at soon, and then a URL which is the location of our JSON file. If the JSON file was located online you would create an online URL here, but for this example we’re using a local file as this ensures we can run the project without any connection issues. Once we’ve done this, we call the locationsFromJSONFile: method on the JSONLoader instance. This will return an NSArray of Location objects that we can then use as a data source to display in the table. Notice that the NSArray instance variable, _locations, has been declared in the first line of the implementation:
NSArray *_locations;
Once the array of Location objects has been returned by the call to locationsFromJSONFile:, we then ask the table view to reload its data. This will in turn trigger the call of the Table View Controller methods, tableView:cellForRowAtIndexPath: and tableView:numberOfRowsInSection: which will supply the information needed to display the rows in the table.
Notice that the method call locationsFromJSONFile: is dispatched on a queue. This ensures that the operation to connect to the URL and fetch the JSON data is performed on a background thread so that we don’t block the UI. Once the data has been received we can then load the data in the table on the main UI thread by calling performSelectorOnMainThread:withObject:waitUntilDone:. The golden rule in iOS is that all UIKit objects methods should be accessed on the main thread.
The over-ridden method prepareForSegue:sender: simply ascertains which row in the table was selected and passes on the corresponding Location object to the target destination View Controller. This destination view, LocationDetailViewController, then displays the information in the Location object in a set of text fields and as a pin on a map.
Now that we know how the JSON data is loaded and presented to the user in a table view, let’s look under the hood at the model classes that do the work of parsing the contents of the JSON file and turning it into something that we can use in the application. Open the class file, JSONLoader.m and look at the following code:
- (NSArray *)locationsFromJSONFile:(NSURL *)url {
    // Create a NSURLRequest with the given URL
    NSURLRequest *request = [NSURLRequest requestWithURL:url
                                             cachePolicy:NSURLRequestReloadIgnoringLocalAndRemoteCacheData
                                         timeoutInterval:30.0];

    // Get the data
    NSURLResponse *response;
	NSData *data = [NSURLConnection sendSynchronousRequest:request returningResponse:&response error:nil];

    // Now create a NSDictionary from the JSON data
    NSDictionary *jsonDictionary = [NSJSONSerialization JSONObjectWithData:data options:0 error:nil];

    // Create a new array to hold the locations
    NSMutableArray *locations = [[NSMutableArray alloc] init];

    // Get an array of dictionaries with the key "locations"
    NSArray *array = [jsonDictionary objectForKey:@"locations"];
    // Iterate through the array of dictionaries
    for(NSDictionary *dict in array) {
        // Create a new Location object for each one and initialise it with information in the dictionary
        Location *location = [[Location alloc] initWithJSONDictionary:dict];
        // Add the Location object to the array
        [locations addObject:location];
    }

    // Return the array of Location objects
    return locations;
}
The NSURLRequest and NSURLConnection part of the code is pretty much the standard approach to getting data from a given URL. We are using the static method sendSynchronousRequest rather than an asynchronous call because the whole method is being called on a queue as we saw earlier. The magic happens in this line:
The NSJSONSerialization class has a static method, JSONObjectWithData:options:error, which parses an NSData object and returns a Foundation object. This is typically an NSDictionary or an NSArray depending on how the JSON data is structured. The example locations.json file is structured as a dictionary consisting of one key, “locations”, mapped to an array of dictionary values. We access the array with the following line:
#import "Location.h"

@implementation Location

// Init the object with information from a dictionary
- (id)initWithJSONDictionary:(NSDictionary *)jsonDictionary {
    if(self = [self init]) {
        // Assign all properties with keyed values from the dictionary
        _title = [jsonDictionary objectForKey:@"title"];
        _place = [jsonDictionary objectForKey:@"place"];
        _information = [jsonDictionary objectForKey:@"information"];
        _telephone = [jsonDictionary objectForKey:@"telephone"];
        _latitude = [jsonDictionary objectForKey:@"latitude"];
        _longitude = [jsonDictionary objectForKey:@"longitude"];
        _url = [jsonDictionary objectForKey:@"url"];
        _visited = [jsonDictionary objectForKey:@"visited"];
    }

    return self;
}

@end
The Location class is simply a set of properties that map to the key names that are found in the location.json file. If you recall, the first set of data looks like this:
"title": "The Pump Room",
"place": "Bath",
"latitude": 51.38131,
"longitude": -2.35959,
"information": "The Pump Room Restaurant in Bath is one of the city’s most elegant places to enjoy stylish, Modern-British cuisine.",
"telephone": "+44 (0)1225 444477",
"url": "http://www.romanbaths.co.uk",
"visited" : true
So, by writing code like this:
_title = [jsonDictionary objectForKey:@"title"];
we are effectively assigning values to the properties in the Location class:
title = “The Pump Room”
place = “Bath”
and so on. (Note that the instance variables are prefixed with underscores. Because the properties are readonly we can only assign values directly to the underlying instance variables which are automatically synthesised for us).
We now have all of the information for a location encapsulated conveniently in a model class, Location.
If we take a look at the LocationDetailViewController.m class file we can see that in the viewDidLoad method we access all of these properties to populate the fields in the view. Note that the boolean value for “visited” is a NSNumber type which has to be converted to a BOOL type in order to set the value for the UISwitch control. The latitude and longitude properties are also NSNumber objects and these have to be converted to double values to create the coordinates for the map pin.
Wrap up
This post has, I hope, given you a start with parsing JSON and mapping the data to a simple model class. Of course, the structure and hierarchy of your own model classes will depend on the structure of the data in whatever JSON file or stream that you are working with.
I think most iOS developers know by now how to create a segue from one View Controller (VC) to another. A segue is the transition between one View Controller and another that occurs when you press a button, or press on a row in a table. It’s easy enough to create one in Interface Builder simply by Ctrl-dragging from the source object to the target View Controller. The options for the segue are “Push”, “Modal” and “Custom”.
Push Segue
A Push segue is used when you’re using a Navigation Controller. The first VC is placed on the navigation stack and the Second View Controller slides into view. When you press the “Back” button the Second VC is dismissed and the first VC is “popped” off the stack and is presented again.
Modal Segue
A “Modal” segue creates a relationship between the VC that did the presenting and the VC that was presented. Put simply, when a modal segue occurs, the target VC is presented in front of the source VC and it’s the responsibility of the presented VC to dismiss itself at some point, perhaps when triggered by pressing a “Done” or “Cancel” button.
Transitions
On an iPhone, there are four types of transitions available:
Cover Vertical (default)
Used to interrupt the current workflow to gather information from the user. The presented VC should provide buttons to dismiss itself by means of a “Done” button and an optional Cancel button.
Flip Horizontal
Used to temporarily change the work mode of the app. For example, to display settings as in the Stocks and Weather apps. Usually requires a button to return the user to the previous state.
Cross Dissolve
Used to present an alternate interface when the device changes orientations. The app is responsible for presenting and dismissing the alternate VC in response to orientation change notifications.
Partial Curl
Used to curl up one corner of the current VC to reveal a partial view on the presented VC. This transition was used in the Maps app on iOS 6 to reveal settings.
The first three of these stock transitions are fine for the prescribed cases where you want to adhere to Apple’s UI guidelines, but I’m not sure if the Partial Curl transition style fits in with the new flat design philosophy of iOS 7. We’re beginning to see different types of transitions in iOS 7 where views seem to “fly in” and “fly out”, and, in fact, Apple have introduced a new API using the UIViewControllerAnimatedTransitioning protocol to manage these animations. This will be the subject of a future blog post.
Custom Segue
In this post I want to show how to create an expanding and contracting animated transition using the third segue type, “Custom”. In this transition, pressing a button in the first View Controller will initiate an animation effect where the target View Controller expands and grows from the button to become a full screen view. Once the target VC is displayed, pressing another button will show an animation of the view shrinking back to the original button. This latter transition will use an “Unwind Segue”, a type of segue that reverses back to the original VC.
The example Xcode project is hosted at GitHub and you can either clone it or download it from here:
(Note that I’ve set up this project to run only on iOS 7. This makes it easier to work with. You’ll therefore need to be using Xcode 5.)
Load the example project in Xcode and run it in the iOS simulator. When you see the first screen press the “Segue Segue Sputnik!” button:
First View Controller
This will animate to the next screen, the Second View Controller:
Second View Controller
Now press the “Get Back!” button. Notice how the screen shrinks back to the original button. Quite a nice effect. Let’s see how it’s done.
First of all, let’s take a look at how we create the forward segue.
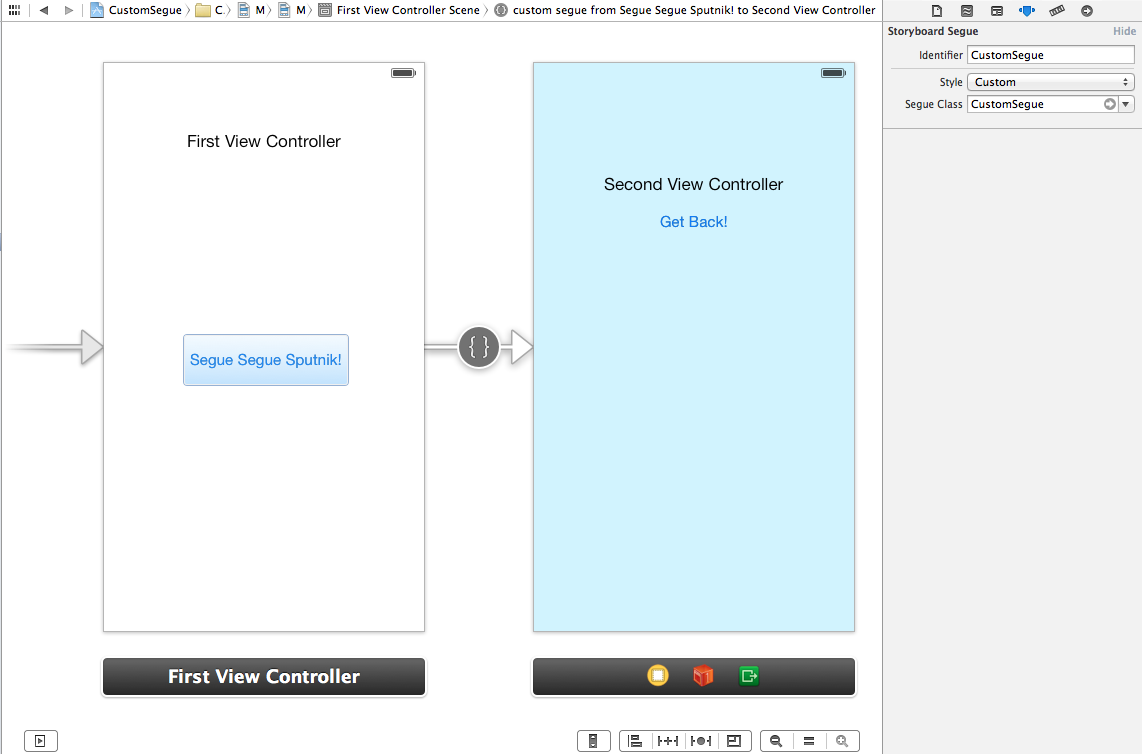
In Xcode select the “Main.storyboard” file so that you can view it in the Storyboard editor. Then select the segue (arrow) that goes from the left View Controller to the right View Controller so that you can view its properties in the Inspector:
Storyboard
To create the segue I simply Ctrl-dragged from the button in the left VC to the right VC. Xcode created the segue for me, and all I had to do was edit the details in the Inspector. If you look in the Inspector, you can see that I’ve given the segue an identifier name of “CustomSegue”, chosen the style “Custom”, and referenced the class, “CustomSegue”. So what does the CustomSegue class actually do? Let’s take a look at it:
@implementation CustomSegue

- (void)perform {
    UIViewController *sourceViewController = self.sourceViewController;
    UIViewController *destinationViewController = self.destinationViewController;

    // Add the destination view as a subview, temporarily
    [sourceViewController.view addSubview:destinationViewController.view];

    // Transformation start scale
    destinationViewController.view.transform = CGAffineTransformMakeScale(0.05, 0.05);

    // Store original centre point of the destination view
    CGPoint originalCenter = destinationViewController.view.center;
    // Set center to start point of the button
    destinationViewController.view.center = self.originatingPoint;

    [UIView animateWithDuration:0.5
                          delay:0.0
                        options:UIViewAnimationOptionCurveEaseInOut
                     animations:^{
                         // Grow!
                         destinationViewController.view.transform = CGAffineTransformMakeScale(1.0, 1.0);
                         destinationViewController.view.center = originalCenter;
                     }
                     completion:^(BOOL finished){
                         [destinationViewController.view removeFromSuperview]; // remove from temp super view
                         [sourceViewController presentViewController:destinationViewController animated:NO completion:NULL]; // present VC
                     }];
}

@end
Our Custom segue is an instance of UIStoryBoardSegue. This makes sense as we’re using a segue as created in a Storyboard. There’s only one method that we need to over-ride, the perform method, and this will be called when the segue occurs. As the UIStoryBoardSegue instance contains two properties for the source and target View Controllers we can grab references to those in order to create the animated transition between the two. The rest of the code adds the destination’s view to the source view as a sub-view temporarily so we can see it and create the animation effect. This consists of shrinking the view to a small size, setting its centre point to the originating point (as we’ll see later this is set to be the button that we press) and animating it back to its original size and centre point with a call to [UIView animateWithDuration]. When the animation completes in the completion block, we remove the destination view from its parent super view and then present the destination VC.
Note that our CustomSegue class has a property, originatingPoint, declared in the header file:
@interface CustomSegue : UIStoryboardSegue

// Originating point for animation
@property CGPoint originatingPoint;

@end
The custom segue needs to know the originating point from which to start the animation. This is the “Segue Segue Sputnik” button in the first VC. This is set in FirstViewController.m:
// Prepare for the segue going forward
- (void)prepareForSegue:(UIStoryboardSegue *)segue sender:(id)sender {
    if([segue isKindOfClass:[CustomSegue class]]) {
        // Set the start point for the animation to center of the button for the animation
        ((CustomSegue *)segue).originatingPoint = self.segueButton.center;
    }
}
The method, prepareForSegue:, is invoked just before the segue occurs. This gives us an opportunity to set things up, in our case by checking that this is the right kind of segue (we could have more than one) and to set the CustomSegue‘s originatingPoint to the centre of the button. Once this is done, the segue occurs.
Unwind Custom Segue
Now that we’ve examined how to create a segue going forward, let’s look at how we get back from the second View Controller to the first View Controller. This is done by creating an “unwind segue”. But before we can create one in the Storyboard, there’s one thing we need to do first. An unwind segue requires that you provide an IBAction method in the View Controller that you want to unwind to. This method can have any name but it needs to have the following method signature:
We’ve implemented this in FirstViewController. We don’t actually do anything when this is invoked, but we still need to provide it in order to form the link in the Storyboard, as we shall see.
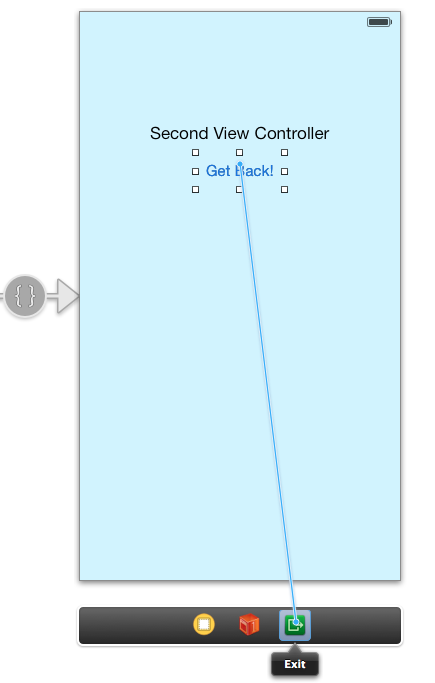
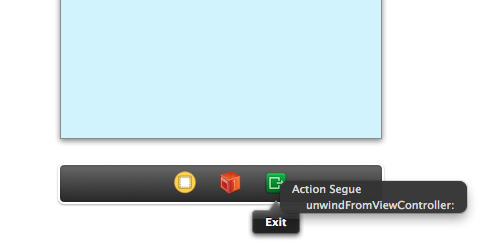
Once we’ve done that, it’s easy enough to create the unwind segue in the Storyboard by Ctrl-dragging from the “Get Back!” button in the second VC to the green “Exit” button:
Making the Unwind Segue
When you release the mouse-button, you’ll see the method name and you can link the connection to it:
Linking to the method
Now you’ve created the “glue” between the second View Controller and the first View Controller, you need to provide an instance of the UIStoryboardSegue that will be used to perform the unwind. When we created the forward segue earlier by Ctrl-dragging from the “Segue Segue Sputnik!” button to the second VC we could specify the identifier and class of the custom segue in the Inspector. With unwind segues we can’t do this, instead we have to instantiate one in code. We can do this in the FirstViewController class by over-riding the segueForUnwindingToViewController: method that’s declared in UIViewController. Here’s our implementation:
// We need to over-ride this method from UIViewController to provide a custom segue for unwinding
- (UIStoryboardSegue *)segueForUnwindingToViewController:(UIViewController *)toViewController fromViewController:(UIViewController *)fromViewController identifier:(NSString *)identifier {
    // Instantiate a new CustomUnwindSegue
    CustomUnwindSegue *segue = [[CustomUnwindSegue alloc] initWithIdentifier:identifier source:fromViewController destination:toViewController];
    // Set the target point for the animation to the center of the button in this VC
    segue.targetPoint = self.segueButton.center;
    return segue;
}
Here we instantiate a new instance of CustomUnwindSegue with the parameters that are passed from the segueForUnwindingToViewController: method and then set the target point that the animation will shrink the view to, in fact it’s the inverse of what we did earlier. If we look at the code for the CustomUnwindSegue class, we can see that it pretty much reverses what we did in the CustomSegue class:
When the animation completes in the completion block we remove the animated view from its parent (as we did earlier) and then dismiss the VC, thus revealing the FirstViewController.
Wrap up
And that’s about it. Please note that you’ll need to target a minimum of iOS 6 in order to work with unwind segues. I think that this is a useful basic pattern for implementing custom segues and unwind segues. Once you’ve established this in your application you can then go on to experiment with different animation techniques as you transition from one VC to the next. As I wrote earlier, iOS 7 introduces some new API to handle animated transitions, and I’ll look at this in a future post.
If you really want to confuse someone when introducing them to Git, use the Command Line Interface. If you hate your colleagues, show them how to use Git with the Command Line Interface. Folks, this is 2013 not 1993. We don’t have to imagine what Git is doing with our files when we can see what it is doing with a Git client’s graphical interface. Sure, there are the Git super-heroes who insist on using the CLI for everything (or that rare species, Linusae Torvaldsicus, who can perform Git magic blindfold), but, please, spare the Git newbie the pain.
Actually, I do think that the CLI is fine for one operation. For this:
$ git init
And that’s all I use it for, initialising a local git repository. After that I use my Git client of choice, SmartGit/Hg. Why? Because I don’t hate myself. Because I want to get work done. Because I actually want to review my changes in a three-way diff viewer, in order that I can stage selected lines of code that I can actually see in a full-size window. Because…well, you get the picture. Do you get the picture?
I prefer something like this:
I was going to write about all of the advantages of a nice Git client such as SmartGit, but Wes McClure has done a good job in his post, “Why I value SmartGit/Hg“. Go read it. If you prefer another client, there are plenty out there. I use SmartGit/Hg because it’s cross-platform and free for non-commercial use. As I work on a cross-platform, open source, free development project it’s perfect. As for the command line…
One of the nice new features introduced in Xcode 5 is the ability for source code comments to be used as documentation displayed in the Quick Help Inspector, in a Help Popup, and for Code Completion. I believe that this is made possible because Xcode now uses exclusively Apple’s own LLVM 5 compiler (GCC support has been removed), so it can build this functionality right in, since the compiler processes the comments along with user code. This kind of feature has long been available for users of other IDEs, such as Eclipse, and so this is a very welcome addition to Xcode, particularly as it might encourage developers to better document their code.
You can use either Doxygen or HeaderDoc format for the comments. As I come from a Java background I like to make the comments as close to JavaDoc as possible.
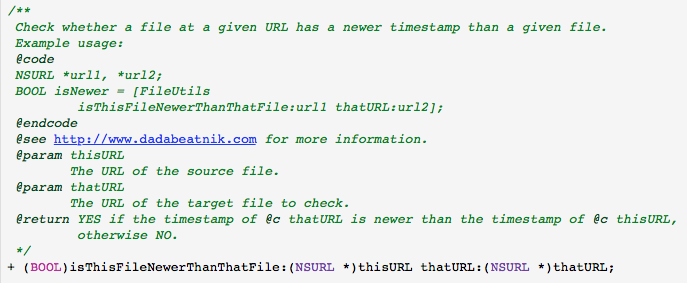
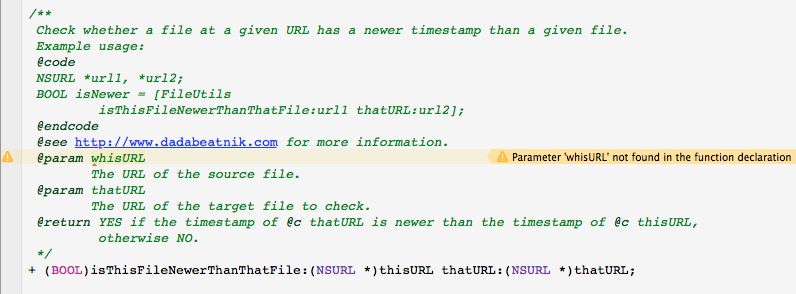
Here’s a simple example. This is a declaration for a utility method to check whether a file at a given URL has a newer time-stamp than another file at a given URL:
/**
 Check whether a file at a given URL has a newer timestamp than a given file.
 Example usage:
 @code
 NSURL *url1, *url2;
 BOOL isNewer = [FileUtils
         isThisFileNewerThanThatFile:url1 thatURL:url2];
 @endcode
 @see https://www.dadabeatnik.com for more information.
 @param thisURL
        The URL of the source file.
 @param thatURL
        The URL of the target file to check.
 @return YES if the timestamp of @c thatURL is newer than the timestamp of @c thisURL,
         otherwise NO.
 */
+ (BOOL)isThisFileNewerThanThatFile:(NSURL *)thisURL thatURL:(NSURL *)thatURL;
In my configuration of Xcode it looks like this:
Xcode method with comments
The comments sit right on top of the method declaration in the header file. There’s no point in putting them in the matching implementation file as we need these comments to be part of the public API.
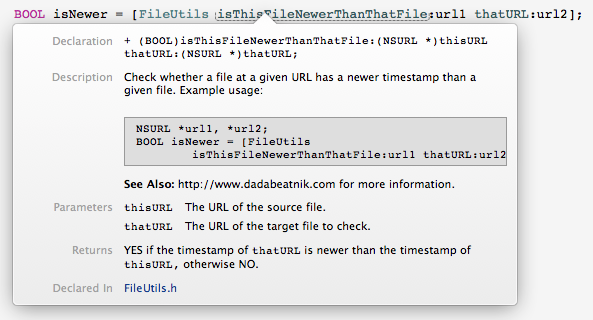
The comment opens with a /** block start and ends with a final */ block end. After the block start I’ve added a general description about what the method does. Then I’ve opened a @code tag and provided some code for example usage (this is a bit like the <pre> HTML tag). The @endcode tag closes it. Then I’ve added a @see tag which will appear as “See Also”. After this are the important tags used to document the two parameters and the return value. These are @param and @return. Note the @c tags in the “Returns” description which serve to display the following word using a monospaced font.
Note that it’s important to save your source file in order for Xcode to detect a change to the file and regenerate the documentation from the comments.
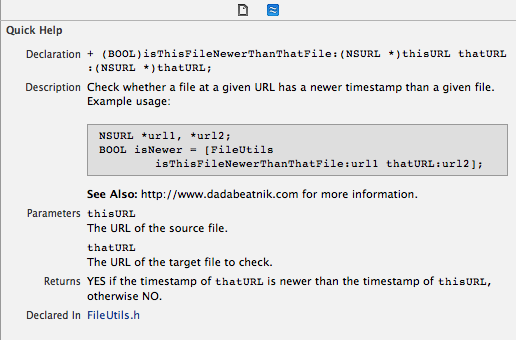
Now that this is done, if we select the method in the editor either here in the declaration, or as implemented, and then Option-Click on it we get the Help popup:
Xcode Help Popup
And it will also display in the Help Inspector:
Xcode Help Inspector
And also will appear for Code Completion:
Code Completion
As a bonus, if we want to ensure that we get the spelling of the names of the parameters right, there’s even a project setting built into Xcode that will check and warn us:
Xcode Documentation Comments Settings
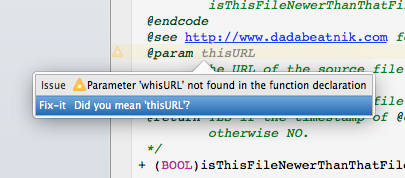
Now, if I create a typo in the documentation I see this:
Xcode typo warning
Clicking on the yellow triangle leads to a very helpful suggestion:
Xcode Assist
And that’s about it. A very nice and welcome addition to Xcode. Now that Apple is focussed on only supporting its own LLVM compiler in Xcode, I hope we’ll see more of these types of features in future versions.
In this final blog post in the series, I want to examine the impact and popularity of the Archi tool.
Archi 2.4 was released in December 2012. In the previous two years of development I had implemented a fairly respectable feature set, and devised some unique features, thanks to a source of funding that paid my wages, and the feedback and enthusiasm of Archi’s users.
Archi 2.4
Just how popular has Archi been? And how popular is Archi right now? I suspect that it has been, and still is, very popular.
In 2011, Christina Smart, from a Jisc-funded organisation, interviewed me for a blog post, Business Adopts Archi Modelling Tool, and I spoke of the possible reasons for the extensive adoption of Archi, especially in the business sector:
CS: Archi has a growing number of users outside education, who are they and how did they discover Archi?
PB: …I am also aware of other commercial companies using [Archi], but how did they discover it? Well I think it’s been viral. A lot of businesses spend a lot of money advertising and pushing products, but the alternate strategy is “pull”, when customers come to you. Archi is of the pull variety, because there is a need out there, we haven’t had to do very much marketing, people seem to have found Archi on their own. Also the TOGAF (The Open Group Architecture Framework) developed by the Open Group is becoming very popular and I guess Archi is useful for people adopting TOGAF.
CS: Why do you think it is so popular with business users? PB: I’m end-user driven, for me Archi is about the experience of the end users, ensuring that the experience is first class and that it “just works”. It’s popular with business users firstly because it’s free, secondly because it works on all platforms, thirdly because it’s aimed at those making their first steps with ArchiMate.
When I spoke about the concept of “pull”, I was referring to the book, The Power of Pull, by John Hagel. Tom Graves, the author, Enterprise Architect, “business anarchist”, and self-proclaimed “confusionist”, once said to me, in a telephone conversation, that he thought that Archi’s popularity was due, partly, to this “power of pull”. Archi had no advertising budget, it had no pushy salesmen, nor was it ever promoted in any significant way. Instead, users discovered it by word-of-mouth, by a friendly recommendation, or via a simple Google search. Together with an agile feedback loop between developer and users, popularity increased. Users clearly liked the whole package – both the developer and the product.
This is not rocket science. For me, this approach comes easily and naturally. I only have to think of the products and websites that I like, and think about why I like them, and just do the same. The key is to be open, clear and honest. People will come to you. I’m not a big fan of websites that claim to be selling a software product but where you have no idea what the software does, how to download it, how much it costs, or what it looks like. Instead you get a series of stuffy “white papers” explaining the benefits of nebulous “solutions” written in MBA sound-bites. Nor did I employ the “push and grab” approach – flooding the twitter-verse with tweets telling us of the “Top reasons to get a grip on the latest #archimate and #togaf trends!!!! Read our new white paper!” I know where “white paper” belongs in my household...
If you look at the front page of the Archi website it’s immediately clear what Archi is, does, how much it costs (nothing), what it looks like (screenshots), and where to download it:
Archi is a free, open source, cross-platform tool and editor to create ArchiMate models.
And I strongly believe that even the largest of organisations can relate to this honest, no-nonsense approach. That’s why I call myself a “code punk”. The software may only play three chords, but they’re honest and powerful ones.
Statistics and Google Analytics
I think we can get a sense of this popularity by looking at some statistics for that period. The old Archi website (no longer maintained), was tracked by Google Analytics. First off, let’s take a look at the figures for the year previous to when this blog post was written (September 21 2012 to September 21, 2013):
Archi Website Visits
Here we can see that in this yearly period, there were 71,752 visits to the website, of which 44,444 were unique visitors. Taking the unique visits alone, that’s about 3700 a month, or about 850 a week. Not bad. We can also see that a large proportion of visits (10,558) came from the Netherlands. This is not surprising given that ArchiMate is, as well as cheese and tulips, a Dutch product. The UK and the US follow closely behind. Here’s another view of the demographic location data:
Archi Website Locations
It’s interesting that India and Russia are in the top 10. Russia has a thriving community of Archi users, perhaps due to the fact that it was translated into Russian by Anatoly Levenchuk from Moscow. Again, this is an example of how the Archi community has contributed significantly toward its success.
Software Downloads
But what about the download numbers of the actual software?
Archi Downloads
Let’s take the figures for Archi version 2.4.0. Here we need to make some adjustments because Archi 2.4.0 was released in December 2012, and this reporting period starts from September 2012 (hence the figures for Archi 2.3.1). Therefore, this represents about 9 months for Archi 2.4.0. Adding up the numbers for the Windows executable (8,374), the Windows zip install (2,671), the Linux version (487), the Mac 64-bit version (360) and the Mac 32-bit version (67) we get a grand total of 11,959 downloads of Archi over a 9-month period. That’s about 1300 downloads a month.
It seems a lot. We could knock off a percentage for duplicate and failed downloads. But then again, these figures only show who actually clicked on a download link on the downloads page. There are probably direct downloads linked from other pages and referrals. Also, some organisations that I know of roll out only one centralised copy of the software throughout the company, so this might only show as one download, or not show at all if they have a direct link.
However you interpret these figures, I feel confident in thinking that Archi is probably the most popular ArchiMate modelling tool. Of course, this assumption is based on these download figures and the many emails I’ve received over the last three years. Put it this way, there are a couple of Fortune 500 companies that I know of, and some very large organisations that use Archi as their only ArchiMate modelling tool. I believe also that a couple of large training organisations use it as their training tool. Given that it was only meant to be a “starter” application, I find that interesting.
Archi has come a long way since its initial incarnation as a “proof of concept” tool.
Futures
Where now for Archi? I no longer work for the organisation that hosted the original development work on Archi and it’s time to move on! Also, Eclipse, the software framework on which Archi is built, has changed radically with the latest version 4, and this introduces some new challenges which need to be solved. The answer lies in the fact that the software is open source. All of the code can be found at GitHub, and is released with a MIT-type licence. If Archi is to be sustained, it will need to be migrated to Eclipse 4, and it needs to implement some of the most requested features from its hundreds of users. This will require the input of other developers, and so the next step is to get more developers on board.
I’d like to say thanks to all Archi’s users and supporters, for playing their part and allowing it to happen. It was, and is, I think, a success. With around 10002000 3000 downloads each month I’d say that Archi is quite popular.
Update 11 March 2014 -We are now seeing around 3000 downloads a month of the latest version of Archi at https://www.archimatetool.com. Since I set up this new website, Archi’s popularity and reputation has doubled and we’ve also attracted some additional developer interest.
Begin typing your search term above and press enter to search. Press ESC to cancel.