Right, let’s get on with this thing. I’m going to connect the vero board up to the test harness and see if this thing rocks. Or not…
Testing Board
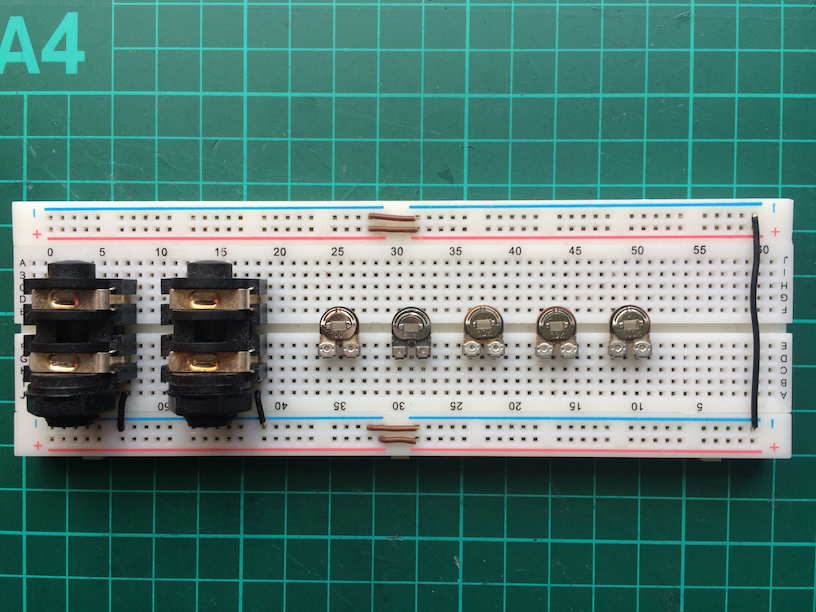
As I said before, I’m not going to connect it to the actual pots and jacks that I’ll be using in an enclosure just yet. I have a testing breadboard that I can quickly connect everything to. Here it is:
Starting from the left, there’s a jack socket for the guitar input, one for the guitar output and then 5 trim pots that are stand-ins for the 5 potentiometers that I’ll use later.
The jack sockets are attached to the breadboard and there are two small lengths of black wire connecting the ground terminals to the negative ground rail (the blue strip on the breadboard).
These sockets are 6.3mmm Mono Jack Sockets from Bitsbox
The trim pots are also from from Bitsbox. I bought a Trimmer Kit containing 45 of these pots with a range of values from 100R to 1M ohms. Very handy for prototyping.
From left to right the ones I’ve attached to the breadboard are:
– 100k (Density)
– 50K (Bias)
– 10K (Fuzz)
– 10K (Filter)
– 100K (Level)
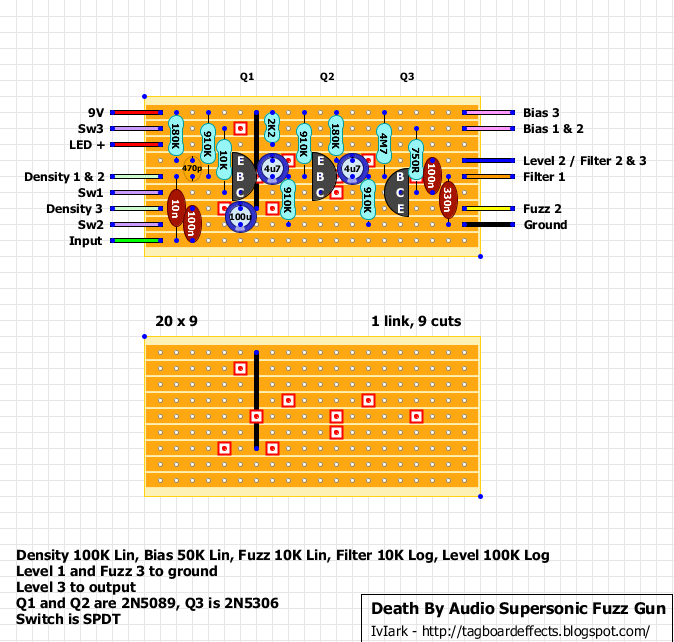
The rubric in the layout diagram specifies that some of the pots are Linear and some are Logarithmic:
“Density 100K Lin, Bias 50K Lin, Fuzz 10K Lin, Filter 10K Log, Level 100K Log”
These trim pots are all Linear but for testing it doesn’t matter. At this stage I just want to ensure that the circuit basically works. In fact, sometimes I use trim pots that are not the exact value specified but close enough.
Breadboard connections
Now I’ll refer to the layout diagram again to make the connections:
The first thing I do is see if there are any connections that I can make on the breadboard:
Density 1 & 2 – this wire will connect to the first two connections of the Density pot. So I can connect these two together on the breadboard.
Bias 1 & 2 – this wire will connect to the first two connections of the Bias pot. Again, I can connect these two together on the breadboard.
Level 2 / Filter 2 & 3 – this wire needs to connect to three places. I can connect all three with jumper wire on the breadboard.
Level 1 and Fuzz 3 to ground – this means that I can connect a short jumper wire from each of these to the breadboard’s negative ground rail.
Level 3 to output – this means I need to add a jumper wire from the third connection of the Level pot over to the output connection on the output jack socket.
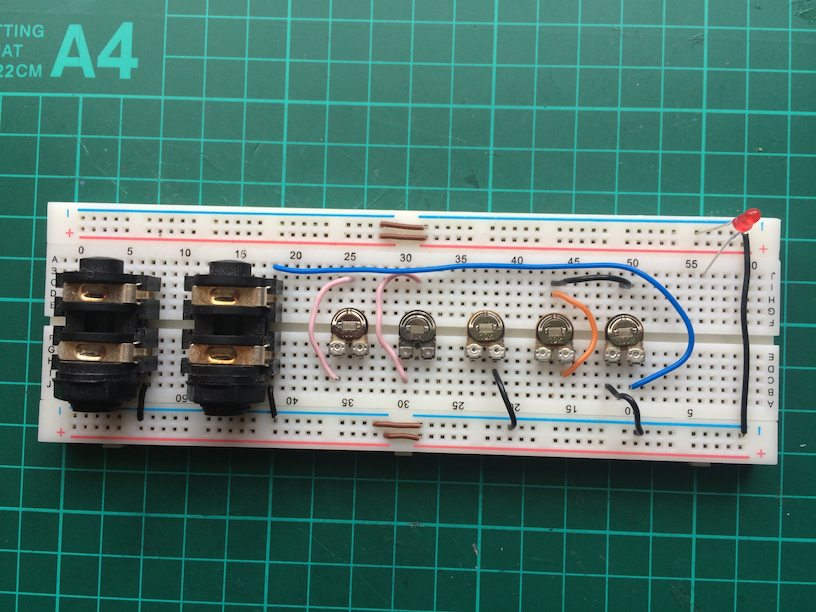
Here’s what those connections look like:
You can see the long blue jumper wire connecting from the Level pot to the output jack socket. Also, the two short black jumpers connecting to ground. Ignore the LED in the top-right as I just put it there to remind me to connect it up later.
Connecting the Vero Board
Now I’ll connect all the wires from the vero to the breadboard. Here’s a list of the connections as specified in the layout diagram, working from the top-left and then the top-right downwards:
9V – connects to the red power rail of the breadboard
Sw3 – (this wire is already soldered to the switch)
LED+ – connects to the positive side of the LED that I’ll add to the breadboard
Density 1 & 2 – connects to the Density pot terminal 1 or 2
Sw1 – (this wire is already soldered to the switch)
Density 3 – connects to the Density pot terminal 3
Sw2 – (this wire is already soldered to the switch)
Input – connects to the Density pot terminal 1 or 2
Bias 3 – connects to the Bias pot terminal 3
Bias 1 & 2 – connects to the Bias pot terminal 1 or 2
Level 2 / Filter 2 & 3 – connects to either of the Level terminal 2 or Filter 2 or 3 terminals (since they’re all connected together)
Filter 1 – connects to the Filter pot terminal 1
Fuzz 2 – connects to the Fuzz pot terminal 2
Ground – connects to the black power rail of the breadboard
And here it is connected up:
Note that I’ve connected the 3mm red LED between the negative ground rail and the connection coming from the vero board.
I’ve connected a 9v battery (courtesy of Electro-Harmonix) to the breadboard’s power rails and I’ve also plugged in a guitar and an amp. 🙂
And I’m ready to rock….and I’m hitting a power chord on my Strat…
….does it work?
Tune into tomorrow’s thrilling episode to find out!


